Total Pageviews

Showing posts with label diorama. Show all posts

Thursday, June 23, 2022

Railway Crossing Multi Track Two Way

    This article is based on the article with same name and Railway Crossing Part 4: Putting it all Together article.

   My tests included few models until at last version with sounds (warnings) and other count method for trains, but main structures are same:

Railway_Crossing_1 (just added tip and free lights), sketch: us_barriers_rudysarduinoprojects_1b.ino


Railway_Crossing_2 (added sounds using Mike Osborn MKO tips),sketch: bell_and_button_servo_4
Railway_Crossing_3 (added sounds and test different count methods: original with few updates or big changes)
with 3 sketches 
   For last sketch, I uploaded this videos:
Railway Crossing with lights and sounds for Multi Track Two Way
   If no train between IR sensors, barriers (gates) are open:
but at least a train is between sensors, barriers (gates) are closed:


29.08.2022
   I changed the sketch for remove sound after gate is open (us_barriers_2b_2)
as Jedidiah Sawyer wanted. 
   Last change of the sketch is to have also fading light as in 2nd Avenue Railroad Crossing, Clanton, AL

so, last sketch is us_barriers_2b_3
and a short video made by Jedidiah Sawyer:

31.08.2022
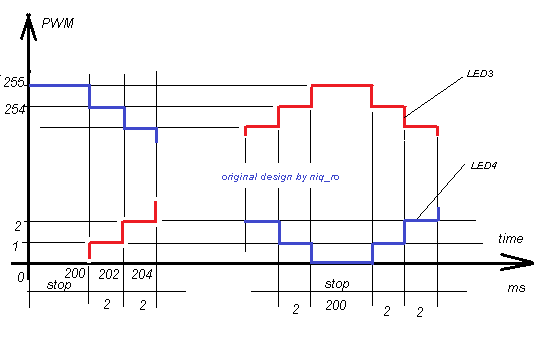
   The variable for change the fade effects are:
and the fade for LED3 is
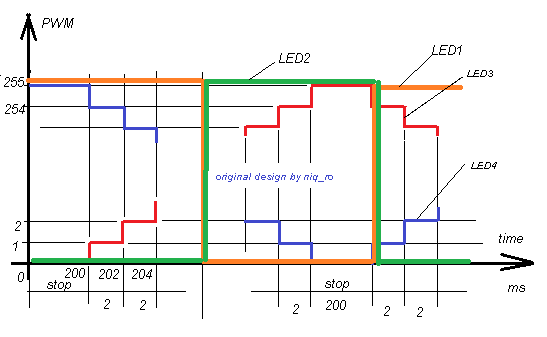
so, LED3 is off (brightness = 0), than after 200ms (variable time_to_stop) brightness increased at 1 (variable fadeAmount), than after 2 ms (variable fade_delay) brightness is 2, after more 2ms brightness is 4, etc, until brightness is 255 (maximum = 100%) .. is a pause (time_to_stop = 200ms) and after that brightness decrease with 1 at every 2ms until 0... 
Leds for blink effect (LED1 and LED2) are same period as fadding leds (LED3and LED4):
..so, you can change the values as you want,...

Wednesday, May 18, 2022

How to define, store, test and control the turnouts (with servo) in DCC++Ex

    As a beginner with model railroading I tested also DCC control using a custom locomotive.

My custom locomotive was make using just bogie from an old locomotive, adding DCC ready board and NEM652decoder.


   DCC control was choose as DCC++EX
so, I used for as Command Station: Arduino Mega development board, a Motor shield, ESP8266-01 with logical level adapter, i2c LCD1602 (and than OLED)  display + 4 servos connected at an expander board on i2c with 16 outputs using PCA9685 chip, using info from
https://dcc-ex.com/get-started/wifi-setup.html
https://dcc-ex.com/get-started/installer.html
  For the throttle I used 2 versions:
   I was interested to control servos (for future turnouts) so I used info from:
https://dcc-ex.com/reference/software/command-summary.html
   Base commands for turnouts in DCC++EX are:
and for SG90 servo:
   Easiest mode is to use web throttle (serial control)
   So, for first servo (turnout), command is <T 200 SERVO 100 410 205 3>, where 200 is choose ID for turnout, 100 is VPIN (virtual pin for first servo connected at PCA9685), 410 is PWM number for throw (open) for SG90, 205 is PWM number for close position and 3 is slowest movement (0 is fastest movement).
   For second servo (turnout), command is <T 201 SERVO 101 410 205 3>, where 201 is choose ID for turnout, 101 is VPIN (virtual pin for second servo connected at PCA9685), 410 is PWM number for throw (open) for SG90, 205 is PWM number for close position and 3 is slowest movement..
   So, for third servo (turnout), command is <T 202 SERVO 102 410 205 3>, where 202 is choose ID for turnout, 102 is VPIN (virtual pin for third servo connected at PCA9685), 410 is PWM number for throw (open) for SG90, 205 is PWM number for close position and 3 is slowest movement .
   So, for first servo (turnout), command is <T 203 SERVO 103 410 205 2>, where 200 is choose ID for turnout, 100 is VPIN (virtual pin for first servo connected at PCA9685), 410 is PWM number for throw (open) for SG90, 205 is PWM number for close position and 2 is medium movement.
   Next step (mandatory) is to store this turnouts in EEPROM memory using <E> command
   I can check the defined turnouts using <T> command
   Base commands are:
- to throw (open) thefirst turnout
- to close the first turnout

   When open Android "Engine Driver" I saw the turnouts defined
so I ca control the servos:
- all turnouts throw (open)

- first turnout closed, rest turnouts open

- all turnouts closed

     You can see a video with control the turnouts with servo: 4 servo (turnouts) controlled by Arduino as DCC++Ex Station and Engine Driver app


Bibliography: