Sunday, August 26, 2018

WebServer with ESP32

   I buy an Geekcreit® ESP32-DevKit development board and I want to test quickly, so I use information from article ESP32 Web Server – Arduino IDE writted by Rui Santos.
    I discover that development boar has 2 built-in leds, one at GPIO0 and one at GPIO27 (while om net is mentioned just GPIO27), so I change the sketch to use this leds and to invert logical level because leds are connected thru resistors at +3,3V not GND.
   Changed sketch is ESP32_WebServer.ino and you can upload in ESP32 development board after follow steps from article Installing the ESP32 Board in Arduino IDE (Windows instructions).
   After upload my sketch, in serial monitor it appear IP adress for local WebServer
   First, both leds are off
but after you push virtual button from webserver named GPIO0 led will lit (upper button)
and after push botton button (GPIO27) apropriate led will lit
 To have just GPIO27 led lit, must pust on GPIO0 button
   I made Web Server with red ESP32 board from Banggood movie where is presented how WebSwever control the two leds

Friday, August 24, 2018

Show Temperature and Humidity as WiFi SSID with ESP8266 and DHT22 Sensor

   I use informations from article Show Temperature and Humidity as WiFi SSID with ESP8266 and HTU21D Sensor, just change sensor. Instead HTU21D, I use DHT22 (AM2302), my schematic is
   I program NodeMCU development board (work any development board with ESP8266: Lolin, Adafruit, WeMos, etc) with Arduino IDe software, using dht_custom_ssid_exp8266_1.ino sketch.
   For frogram ESP8266 as Arduino must follow steps from เพิ่มบอร์ด ESP8266 ใน Arduino IDE (or from my article named Placa NodeMcu v.0.9 programata in Arduino IDE).
  Also, you need 3 library:
- DHT
Pstring
Streaming
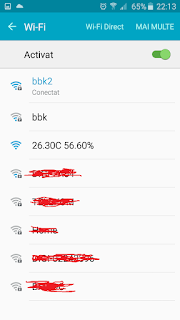
   Now, we can find Wi-Fi network with custon name (ESP8266 is in AP mode):
- on Android phone
- on PC with Windows 7
   Name of SSID will change at every 10 seconds, but best view is in Android phone (quick change).
   I made Show Temperature and Humidity as WiFi SSID with ESP8266 and DHT22 Sensor video to see how this system work:


Saturday, August 18, 2018

128x128 1.5" OLED display with SSD1327 controlled by ESP32

original article

   I received an interesting display for test (OLED technology, 128x128 resolutios, SSD1327 driver) for made to work with ESP32 development board.

   Default, connexion is for SPI, but you can change to i2c connexion, see in schematic from here.
   I search info and after few tests, I used with good results u8g2 library  and my config is
U8G2_SSD1327_MIDAS_128X128_F_4W_SW_SPI u8g2(U8G2_R0, /* clock=*/ 13, /* data=*/ 12, /* cs=*/ 14, /* dc=*/ 27, /* reset=*/ 26);
   You can see 1.5” OLED display with ESP32 movie