Total Pageviews

Wednesday, November 9, 2016

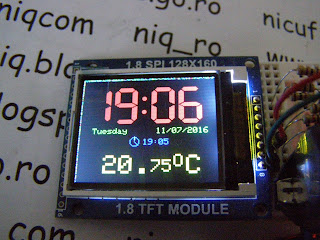
Another adjusting clock with alarm & thermometer using DS3231 on 1.8" ST7735 display

   I use some schematic as in previous article  but is different sketch.
   I adapted original sketch from educ8s.tv to use manual adjustment for date and hour, alarm. Also, I remove RTC library and use subroutines for set and read data and hour, for read inside temperature of DS3231, alse I stored in EEPROM memory hour, minute and state of alarm.
  Last sketch is educ8stv_rtctft160_alarm_eeprom.ino with all features. Also state of alarm is shown by colour of alarm value and sign:
- alarm is waiting (activated)
- alarm is off (deactivated)
- alarm is on 
   You can see how work tthis version of the clock with alarm, hour & data adjustment in movie named another adjusting clock with alarm & thermometer using DS3231 on 1.8" ST7735 display

Tuesday, November 8, 2016

Adjusting clock with alarm & thermometer using DS3231 on 1.8" ST7735 display

   In previous article I made a clock with manual adjust for date and hour, noow I put a push button for activate and deactivate alarm, also in menu I can change hour and minute for alarm.
   When alarm is activated a small sign and hour for alamr is with whilte
when alarm is deactivated sign and hour is with blue colour.
    When is time alarm (1 minute), if alarm is activate sign is red and LED is lit (instead led you can put a relay module for power a radio, a bulb light, etc)
but if you push ALARM button alarm is deactivade
   Schematic for made this clock is
and the sketch is TFT_DigitalClock_RTC1d.ino.
   I made a movie named adjuting clock with alarm & thermometer using DS3231 on 1.8" ST7735 display when you can see who the clock work:

   PS: I made some changes in last sketch to store hour and state of alarm in EEPROM memory of ATmega, see TFT_DigitalClock_RTC1e.ino !!!

Friday, November 4, 2016

Adjusting clock with thermometer using DS3231 on 1.8" ST7735 display

   I made a clock with manual adjust for data and hour without RTC library, just use subroutines.
   For 1.8"display with ST7735 driver I use TFT_ST7735 library adapted by Bodmer after Adafruit library.
   I use next schematic:
with TFT_DigitalClock_RTC1c.ino sketch (in sketch you will find links with original info about some soubroutines).
   If you push MENU button, enter in mode to adjust hours, then minutes, day of week, years, mounth, day, after that Arduino send data to DS3231 to store and after that clock will work normally, see in adjuting clock with thermometer using DS3231 on 1.8" ST7735 display movie:


Bibliography:
https://github.com/Bodmer/TFT_ST7735
http://andydoz.blogspot.ro/2014_08_01_archive.html
http://www.goodliffe.org.uk/arduino/rtc_ds3231.php
http://forum.arduino.cc/index.php?topic=398891.0
http://nicuflorica.blogspot.ro/2016/11/afisaj-tft-de-18-cu-driver-st7735b-3.html

Saturday, October 29, 2016

1.8" TFT display with ST7735B

   I buy an small 1.8" TFT display with ST7735B driver and I try to connect directly to Arduino Uno board as I see on net... but result was not good... display is almost white
and just disconnect accidentaly the GND I can see something...
   So, I search on Arduino forums and on net (article INSTRUCTABLES: Arduino TFT display and font library ) and I found a solution like Nokia 5110 monochrome display .. I put 1k resistor on each data pins to Arduino to display:
and I tested more Arduino library for this display with ST7735 driver (from Adafruit, TFT library, ucglib library, etc) and I made  move to see .. movie is named ST7735B display with Arduino board

NOTE: Original article is in roumanian language, see Afisaj TFT de 1,8" cu driver ST7735B !!!

Monday, October 3, 2016

Under & overvoltage relay for AC main power supply (2)

   After I test the Measuring AC Voltage with an AC to AC power adapter from OpenEnergyMonitor and put my result on article Measuring AC Main Supply Voltage with Arduino (2) and after I made Under & overvoltage relay for AC main power supply now I change schematic for made a new version for voltage protection relay using this schematic
   If I use main_supply_emonlib_under_overvoltage_ver3.ino sketch after module is powered, on display I see the voltage on main power supply:
and after I push MENU/OK button, on display is undervoltage thereshold, who cand change with + & - buttons:
    After I push MENU button, value is stored in EEPROM memory, on display is overvoltage thereshold, who can be change by + & - buttons:
after push again MENU button, value is stored in EEPROM memory, on display is delay-off tine in second for reconnect coil relay after voltage inoutside range:
   In under & overvoltage relay with Arduino (2) movie you cand see the cases and how you cand cheange value for undervoltage, overvoltage and delay-off time:
   If I use main_supply_emonlib_under_overvoltage_ver3c.ino value for main power supply is displayed with a number after comma (point), exactly as in under & overvoltage relay with Arduino (3) movie:

31.07.2020
   I added a sketch to use LCD1602 alphanumerica display on i2c connexion instead existing display (with MAX7219 and 7-segment led display). Sketch is main_supply_emonlib_under_overvoltage_ver4.ino !

02.08.2020
   I added a new sketch with best implement of delay-on to connect the relay... see main_supply_emonlib_under_overvoltage_ver4a.ino

Under & overvoltage relay for AC main power supply

   After I made a test for Measuring AC Main Supply Voltage with Arduino, now I change the sketch for made protection relay with adjustable limits for undervoltage, overvoltage and delay-off time using 3 buttons:
   After power the module, Arduino read and calculate vltage for AC main power supply and if is ok, coil relay is powered:
   If push MENU/OK button, on display is SET
after 2-3 seconds, on display is undervoltage threshold, who cand change using + & - buttons:
    After you push MENU/OK button, is displayed overvoltage thereshold, who cand change using + & - buttons:
   After you pus MENU/OK buttons on display is delay-off time for reconnect coil relay after voltage is outside good range, also you can change value form 1 tp 20 seconds using + & - buttons:
    After you push MENU/OK button, on display is main voltage:
   I write main_voltage_3.ino sketch who made exactlly in picture, but it more easy to understund cases if you see under & overvoltage relay with Arduino movie

Bibliography: